MacBook Setup for AI Engineering: macOS Tools and Workflow

This is the setup I apply to a fresh MacBook before doing AI engineering work. It is for engineers setting up an Apple Silicon Mac for Python and AI work. It covers the command-line tools macOS does not include, Homebrew, Python with uv, the shell, terminal and editor choices, coding agents, Docker, and local model tools.
Some steps are required and some are my preferences. Xcode Command Line Tools, Homebrew, Git, and a Python workflow are foundations. Warp, iTerm2, Powerlevel10k, Cursor, and local model runners are choices. The commands below install the foundation; the later sections record the choices I make on top.
The steps run in this order:
- Xcode command-line tools.
- Homebrew.
- uv and Python.
- Oh My Zsh.
- Plugins and Powerlevel10k.
Terminal, editor, containers, and local models are independent choices. Skip any of them and the steps above still work.
Command-line tools and Homebrew
Start with Apple’s command-line tools:
xcode-select --installmacOS opens a dialog that walks through the installation.
Homebrew is the package manager I use for the rest of this setup. Its official installer is one command:
/bin/bash -c "$(curl -fsSL https://raw.githubusercontent.com/Homebrew/install/HEAD/install.sh)"The installer explains what it will change and asks for confirmation. The Homebrew installation guide lists the changes and default prefixes.
To run a reviewed installer revision, download the script, check its SHA-256,
and run the local copy. This block uses
commit 150c69d:
(
    set -e
    homebrew_installer="$(mktemp)"
    trap 'rm -f "$homebrew_installer"' EXIT
    curl --proto '=https' --tlsv1.2 --fail --location --show-error https://raw.githubusercontent.com/Homebrew/install/150c69df1e54b0b74c9fcca5a201410a2300816a/install.sh -o "$homebrew_installer"
    printf '%s  %s\n' 12479a24be3f5307eecac7cde670fad7118640f031229e964f544b1367b52a41 "$homebrew_installer" | shasum -a 256 --check
    less "$homebrew_installer"
    /bin/bash "$homebrew_installer"
)
The commit and SHA-256 fix the installer script you run. That script still installs the latest Homebrew release, and later package commands install current versions. The pin does not prove who wrote the commit.
On Apple Silicon, Homebrew installs into /opt/homebrew, which is not on the
default PATH. The installer prints the commands that fix this but does not run
them. Run them yourself:
echo 'eval "$(/opt/homebrew/bin/brew shellenv)"' >> ~/.zprofile
eval "$(/opt/homebrew/bin/brew shellenv)"
The first line makes brew available in every new login shell. The second makes
it available in this one. .zprofile vs .zshrc
explains why the line goes in .zprofile.
Install the command-line tools I use regularly:
brew install uv htop gitmoji pandoc ncdu tmux- uv manages Python versions, environments, dependencies, commands, and lockfiles. The next section sets it up.
- htop is a visual system and process monitor.
- tmux keeps several terminal sessions running in one window.
- ncdu shows disk usage by directory.
- gitmoji adds emojis to commit messages.
- pandoc converts documents between formats.
Python with uv and pyenv
Before adopting uv, I used pyenv to manage Python environments. uv now covers my everyday workflow. Install the latest Python version managed by uv:
uv python installThat installs the latest version available to uv at setup time. Run it with
uv run python, or start a project with uv init. For a project-specific
version, use the pinning workflow in my quick guide to managing Python on macOS
with uv.
I use pyenv when I need a source-built interpreter or custom CPython build options that uv’s prebuilt distributions do not provide. pyenv compiles Python from source, so it needs these libraries first. The list follows pyenv’s suggested build environment:
brew install pyenv openssl@3 readline sqlite3 xz tcl-tk@8 libb2 zstd zlib pkgconfig- openssl provides SSL/TLS support for Python’s
sslmodule. - readline adds line editing and history to the interactive interpreter.
- sqlite3 is the embedded database behind Python’s
sqlite3module. - xz, zlib, and zstd provide data compression.
tcl-tk@8builds thetkinterGUI module,libb2provides BLAKE2 hashing, andpkgconfighelps the build find the other libraries.
uv does not need any of these packages. Skip this block if you do not use pyenv.
Terminal
The default macOS Terminal is fine. I used iTerm2 for years and recently moved to Warp, a Rust-based terminal with built-in AI features. The prompt theme later in this article, Powerlevel10k, needs one change per terminal: set the font to MesloLGS NF. In Warp, also open Settings → Appearance and, under Input, set Input type to Shell (PS1). Warp draws its own prompt by default, so without this change you will not see the Powerlevel10k prompt (Warp prompt docs).
If you stay with iTerm2, these are the two settings I change:
Enable natural text editing
- Open Preferences → Profiles → Keys → Key Mappings.
- Open the Presets… dropdown.
- Select “Natural Text Editing”.
Pick a color theme
- Browse themes at iTerm2-Color-Schemes.
- Open Preferences → Profiles → Colors → Color Presets…
- Select Import and choose the downloaded theme.
Zsh and Oh My Zsh
macOS uses Zsh as its default login shell.
I use the bundled /bin/zsh; install
Homebrew’s Zsh only when you need a
specific newer upstream version.
Check the installed Zsh and the current login shell:
echo "$SHELL"
command -v zsh
zsh --version
If Zsh is installed but is not selected as the login shell, switch to the bundled copy:
chsh -s /bin/zshOpen a new terminal after changing the login shell.
Oh My Zsh adds the defaults and plugin system I use. Its official installer is:
sh -c "$(curl -fsSL https://raw.githubusercontent.com/ohmyzsh/ohmyzsh/master/tools/install.sh)"The installer renames an existing ~/.zshrc to ~/.zshrc.pre-oh-my-zsh and
writes a new one from its template. Copy the settings you want to keep from the
old file into the new one. Run omz update when you want a newer Oh My Zsh. By
default it also asks you every 13 days whether to update.
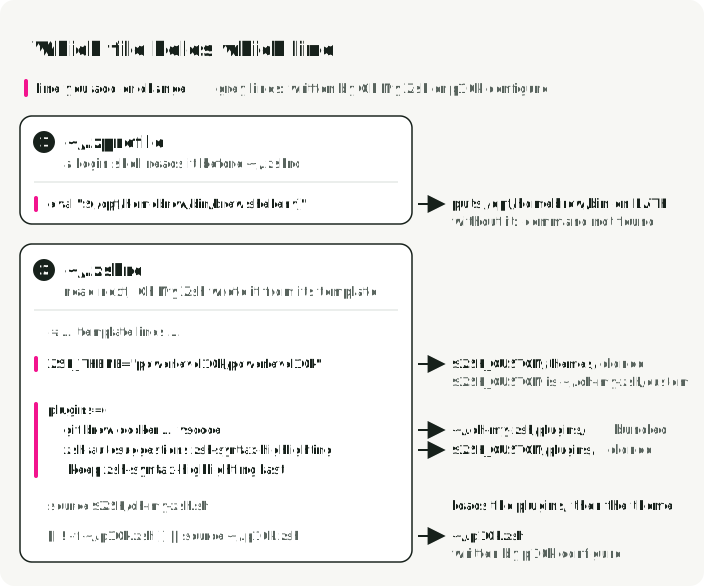
The next two sections add plugins and a theme, and both edit ~/.zshrc. The
figure shows which file holds which line, which lines you change, and where each
line points on disk.
Add plugins
Install zsh-autosuggestions and zsh-syntax-highlighting in Oh My Zsh’s custom plugin directory:
git clone https://github.com/zsh-users/zsh-autosuggestions "${ZSH_CUSTOM:-$HOME/.oh-my-zsh/custom}/plugins/zsh-autosuggestions"
git clone https://github.com/zsh-users/zsh-syntax-highlighting.git "${ZSH_CUSTOM:-$HOME/.oh-my-zsh/custom}/plugins/zsh-syntax-highlighting"
zsh-autosuggestions suggests commands from your history as you type. zsh-syntax-highlighting colors each command as you type, so typos show before you press Enter.
In ~/.zshrc, replace the template’s plugins=(git) line with the plugins for
the tools in this article:
plugins=(
    git brew docker docker-compose macos python tmux vscode
    zsh-autosuggestions zsh-syntax-highlighting
)
Add pyenv to the list if you installed it. Keep zsh-syntax-highlighting last
in the array. My own list also includes aws, gcloud, kubectl, and
pre-commit. Add plugins like these only when you use that tool, because each
plugin adds time to shell startup. The Oh My Zsh plugins
wiki describes the bundled
plugins.
Powerlevel10k and its font
Powerlevel10k is the Zsh theme I use. It shows the working directory, Git status, and active Python environment in the prompt, and provides an interactive configuration wizard. Install it for Oh My Zsh:
git clone --depth=1 https://github.com/romkatv/powerlevel10k.git "${ZSH_CUSTOM:-$HOME/.oh-my-zsh/custom}/themes/powerlevel10k"In ~/.zshrc, replace the ZSH_THEME="robbyrussell" line with:
ZSH_THEME="powerlevel10k/powerlevel10k"Open a new shell and run p10k configure. The wizard writes your choices to
~/.p10k.zsh.
Powerlevel10k’s icons need the MesloLGS NF font. p10k configure can install the
font automatically in iTerm2. For other terminals and editors, download and
install the four TTF files from the Powerlevel10k font
guide, then select
the font. In Warp, open Settings → Appearance → Text and set Terminal font to
MesloLGS NF. In VS Code or Cursor, set the integrated terminal font:
- Open your editor’s settings.
- Search for
terminal.integrated.fontFamily. - Set it to
MesloLGS NF.
Editors and coding agents
I keep one editor open and run one or two coding agents beside it. These days I use Cursor with Codex and Claude Code running in parallel.
- Cursor is a VS Code fork with AI pair programming built in. Use it when you want the model to edit code inside the editor.
- VS Code has the larger extension catalog. Use it when you need an extension Cursor does not support.
- Claude Code and Codex CLI are coding agents that run in the terminal. They read the repository, edit files, and run commands. Use them for changes across many files or tasks that need to run tests.
- GitHub Desktop is a Git client for when I do not want to drop into the CLI.
All of them install as Homebrew casks:
brew install --cask cursor visual-studio-code claude-code codex githubHomebrew does not update Claude Code by itself; run brew upgrade claude-code.
If you prefer automatic updates, use Anthropic’s native installer instead:
curl -fsSL https://claude.ai/install.sh | bash.
Containers and local models
The remaining tools depend on the work I plan to do on the machine. The shell and Python setup does not depend on containers or local models.
- Docker Desktop is the container runtime I use. Its license is free for personal use and for small businesses with fewer than 250 employees and less than $10 million in annual revenue. Larger companies need a paid plan (Docker Desktop license).
- Podman Desktop is open source and has no such license condition. Use it when your company is above those limits and does not pay for Docker.
- Ollama runs as a background service with a local API. Use it when scripts or an application call the model.
- LM Studio is a desktop app for finding, loading, and comparing models. Use it when you want to try models by hand. It can also serve a local API.
These also install as casks:
brew install --cask docker-desktop   # or podman-desktop
brew install --cask ollama-app       # or lm-studio
Local LLMs on macOS compares Ollama, LM Studio, llama.cpp, and MLX-LM in detail.
Repeat the setup on the next Mac
Homebrew can record the formulas and casks from this setup in a Brewfile and install them on a new machine:
brew bundle dump --file ~/Brewfile
brew bundle --file ~/Brewfile
Run the first command on the old Mac; add --force to overwrite an existing
Brewfile. On the new Mac, install Xcode Command Line Tools and Homebrew, run the
brew shellenv step, then run the second command.
Keep the Brewfile and secret-free copies of .zprofile, .zshrc, and .p10k.zsh
in a dotfiles repository. Rerun the uv-managed Python installation and the manual
Oh My Zsh, plugin, Powerlevel10k, and font steps. Restore your shell configuration
files after installing Oh My Zsh, because its installer rewrites .zshrc.
Reapply your terminal and editor settings.
A Brewfile records package names without locking their versions. The restored packages can be newer; the Homebrew Bundle documentation explains this limit.
References
- Apple Terminal User Guide: Change the default shell
- Homebrew installation and Homebrew Zsh formula
- Oh My Zsh installation and Zsh setup on macOS
- Powerlevel10k installation
- pyenv installation and shell setup
- uv Python management
- Warp prompt settings
- Claude Code setup and Codex CLI
- Docker Desktop for Mac and Docker Desktop license
- Ollama documentation